- 1. Download Fonts
- 2. Install Fonts
- 3. Install XML Files
- 4. PowerPoint Basic Shortcuts
- 5. Find & Navigate Slides Easily
- 6. Transfer From V2.0 to V3.0
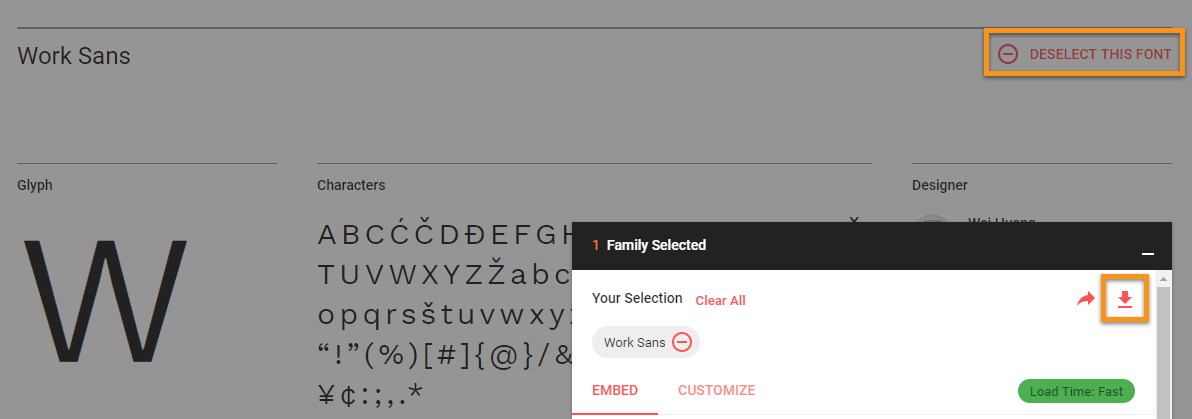
To download fonts from Google Fonts can be tricky
- Select your font
- Click ‘Family Selected’ at bottom of the screen
- Click ‘Download Icon’ to download
A quick guide to downloading and installing the fonts needed to edit this template.
You will probably have to restart the any programs already opened like PowerPoint, Adobe Photoshop etc, before any newly installed font is available for use.
Note: Please restart your PC/Mac.
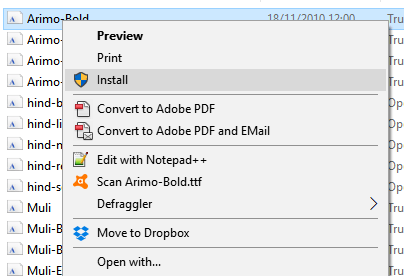
Windows 8 /10
- Extract the fonts, from the downloaded ZIP file, to any directory.
- Select the fonts and right-click (or double click an individual font).
- Select Open (in the case of several selected fonts).
- Click Install from the preview window (1).
Windows 7 & Vista
- Extract the fonts, from the downloaded ZIP file, to any directory.
- Select the fonts and right-click.
- Select Install (2).
Mac OSX
Place the font files into /Library/Fonts (for all users) or into / Users/Your_username/Library/Fonts (4)
Note: If you have Font Book installed, double-clicking on the font file will open Font Book automatically. You’ll see a dialog box with a preview of the font. Press ‘Install Font’ (bottom-right of the window) (5) and the font will be installed.
Copy all XML files inside ‘Warna XML Fonts or Colors’ folder and paste to this location
Note: The font that needs to be downloaded is not the same as the XML font files we provide.
Windows OS
Windows 7
Option 1
C:\Program Files or Program Files (x86)\Microsoft Office\Document Themes 15\Theme Colors
Option 2
C:\Program Files or Program Files (x86)\Microsoft Office 15\root\Document Themes 15
Windows 8 and Windows 10
C:\Users\YourUserName\AppData\Roaming\Microsoft\Templates\Document Themes\Theme Colors
Mac OS
Mac Office 2011
MacintoshHD\Users:YourUserName\Library\Application Support\Microsoft\Office\User Templates\My Themes\Theme Colors
Note: If you don’t see the Library folder please follow this instructions:
Click the desktop to make sure you’re in the Finder, hold down the Option key, then choose Go > Library
Mac Office 2016
MacintoshHD\Users:YourUserName\Library\Group Containers\UBF8T346G9.ms\User Content\Themes\Theme Colors
Also try this:
Try to search Theme Fonts, Theme Colors or Document Themes in your hard drive (System) until you can see file location.
Replace ‘Theme Colors’ to ‘Theme Fonts’ to install font XML files
Watch How To Install Theme Colors/Fonts
1. Gridlines & Guides
Go to View > Turn on/off Gridlines and Guides
2. Zoom In & Out
Hold CTRL + Scroll Up/Down
3. Duplicate
CTRL + D or Hold CTRL + Select and drag
4. Moving Objects
Hold your SHIFT key if you’re trying to move objects in PowerPoint
More info your can read here: External Link
5. Add Pictures
Select shape > Format Shape/Object > Picture or Texture Fill > File... > Find your picture
6. Replace Default Icon
The same way you add a picture.
Select shape > Format Shape/Object > Picture or Texture Fill > File... > Find your icons
7. Resize/Crop Picture
Select shape/image > Format Tab > Crop
Option 01

Option 02
You can use Slide Sorter and use Zoom Level to see all slides.

Transfer project from theme 2.0 to a new 3.0 theme
- Open your current presentation project
- Copy all slides
- Open the 'Warna Framework 3.0' PPTX file
- Paste all slides in it
- Select all slides
- Click the slide layout and select either Warna Cover or Warna Default to apply to all slides.
- Copy all slides again
- Paste all slides in your new theme
- Select all slides and choose 'Warna Default' except for front cover use 'Warna Cover'.
- Done!
- You can start editing your presentation.
- (Recommended) Click 'Reset' to reset all slides after pasting or if you see anything wrong with the theme.